Barbara is an award-winning chef and culinary writer, co-authoring the piece "Tell Me How Long You Want to Live and I'll Tell You What to Eat to Get There," and many others on subjects that stimulate all of the senses.
One sign of a successful dessert bar is that not a morsel is left. That usually means everyone's tastes, including kids', has been satisfied. Try to serve something lemon, something chocolate, and something fruity as those seem to be the flavors most adults crave. When it comes to the kids, give them their own dessert station where you can get as creative as you want.
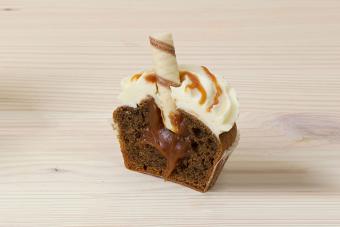
Salted Caramel-Filled Mini Cupcakes Recipe
When salted caramel and cupcakes happen to collide in one delicious bite, as in this recipe, you've got a winning combination. For a dessert bar, mini cupcakes are best because they leave room to sample other goodies. You will need pans that will make 24 mini cupcakes and greaseproof mini cupcake liners.
Heat oven to 350 degrees F. Line two (12 cup) mini cupcake pans with greaseproof liners.
In a medium bowl, whisk together flour, baking powder, and salt, and set aside.
In a large bowl or stand mixer bowl, cream together butter, brown sugar, and white sugar. Add the two eggs, one at a time, beating well after each addition. Beat in tablespoon vanilla.
Add flour mixture and milk alternately, starting and ending with the flour mixture, to the butter-sugar-egg mixture. Make sure the batter is smooth but do not over mix.
Using a cookie scoop, divide the batter evenly among the 24 lined cupcake wells. Bake for 9 to 14 minutes, testing with a toothpick at 9 minutes. Remove from oven when toothpick is clean or has a few crumbs clinging to it. Let stand in pans for 5 minutes, then remove from wells to a wire rack to cool completely.
Make the Salted Caramel Sauce
In a medium saucepan over medium-high heat, place white sugar and stir constantly with a wooden spoon until it has melted completely and develops a golden-brown color.
Add butter pieces, swirling the pan to mix it into the sugar. Place a candy thermometer into the hot mixture and cook until it registers 350 degrees F. Immediately remove from the heat and sprinkle in sea salt stirring it in with a wooden spoon.
With a wire whisk, slowly mix in the heavy cream until well incorporated. Let sauce cool before filling the cupcakes with it.
Fill the Cupcakes
Fill a piping bag fitted with a plain round tip with about half of the cooled caramel sauce. Insert the tip into the center of the top of the cooled cupcake and squeeze.
Remove when you start to see a little caramel sauce oozing out. Set filled cupcakes aside.
Make the Easy Buttercream
In a medium bowl, sift together confectioners' sugar and meringue powder and set aside.
In a stand mixer or large bowl, cream together butter and solid shortening until smooth. Add vanilla and mix well.
Add confectioners' sugar mixture, 1 cup at a time, to the butter-shortening mixture, scraping down the sides of the bowl after each addition. Add the milk slowly, and mix for 5 minutes on high until fluffy. If buttercream is too soft, cover and refrigerate until it can be piped.
Frost and Decorate the Cupcakes
Fit a large piping bag with a medium star tip and fill with buttercream. Pipe the buttercream in a swirled pattern on top of each cupcake and drizzle with some of the remaining caramel sauce.
Add pirouette cookie piece to the top of the buttercream.
Store cupcakes in the refrigerator until ready to serve. Store any leftover buttercream covered in the refrigerator for up to 2 weeks.
Easy Cappuccino Mousse Recipe
With its bold coffee flavor and hint of Kahlua, this is definitely a dessert for adults. Serve it in clear glass tea cups, martini glasses, clear shot glasses, or purchased chocolate cups. These can be portioned out in advance, refrigerated, and set out when ready to serve. A variation would be to substitute chocolate pudding for the vanilla; then it would become a mocha cappuccino mousse.
In a large bowl, use a wire whisk or electric mixer to beat milk, coffee, coffee extract, coffee liqueur (if using), pudding mix and 2 tablespoons sugar for 2 minutes or until slightly thickened.
In a separate large bowl, beat whipping cream and 1/4 cup sugar with an electric mixer on high speed until stiff.
Stir 1/4 of the whipped cream into pudding mixture to lighten it. Then carefully fold in remaining 3/4 of the whipped cream trying not to deflate the volume.
Spoon into clear glass tea cups, martini glasses, shot glasses or chocolate cups. Dust tops with sifted cocoa powder to cover completely. Refrigerate. When ready to serve, garnish each mousse with half of a pirouette cookie and a few chocolate-covered coffee beans, if desired.
Great Dessert Bar Contenders
Make it easy on yourself and select desserts that can be made in advance without suffering any quality issues from a few days' storage. Cookies are prime examples of sweets that can be prepared days or even weeks in advance, if stored tightly covered. The batter can be mixed, portioned and frozen months before baking. Some desserts that need to be assembled at the last minute or require refrigeration perhaps shouldn't be included. But if you want to strut your stuff, there are ways to work around this problem.
Petit fours and French macarons: These delightful French cakes and macaron cookies have been all the rage for some time now. The best part is their vibrant color. They can be a little labor-intensive to make from scratch but it's worth a shot. Otherwise, find a gourmet bakery and purchase them.
Mini cupcakes: Chocolate, vanilla, orange, strawberry, carrot cake, and pumpkin cupcakes in mini size are always welcome, especially since they can be prepared ahead and frosted in different colors and decorations. There are so many high-quality brands on the market these days, you can get away with a boxed mix to start and then go from there.
Fancy cookie assortment: Leave the chocolate chip, peanut butter, and oatmeal raisin for lunches or the kids' dessert station. Now is the time to pull out spritz, shortbread, pecan tassies and other fancy cookies, all of which can be made ahead and stored without compromising their flavor.
Mini cheesecakes: Cheesecake is a perennial favorite and, when made in mini portions, perfect for a dessert bar because they should be served at room temperature for best flavor. Here is where seasonal varieties like pumpkin, apple, raspberry, cranberry, and chocolate can shine. Just take a favorite recipe like this super easy lemon cheesecake and bake it in mini muffin or cupcake pans, garnish with a candied lemon peel and mint and you have a beautiful mini dessert.
Mini filled confections: If the party will be indoors or on a low-temperature day if held outdoors, mini cream puffs, éclairs and crème brûlée are all possibilities for your dessert bar. If you stabilize the whipped cream with gelatin or use an already stabilized custard from a mix, there will be less chance of it breaking down and starting to weep.
Dessert soups: A line-up of demitasse cups filled with fruit soup served cold or at room temperature is such a pretty site on a dessert spread. There are so many options - strawberry, melon, peach, sour cherry - and they can be garnished with the tiniest dollop of unsweetened whipped heavy cream for spectacular effect.
Fresh fruit: A selection of fresh fruit is a welcome sight for those who can't tolerate wheat or dairy. For those who can, simple chocolate-covered strawberries, or those dipped to look like they're wearing tuxedos, are hands-down favorites.
Madeleines: Many people think madeleines are cookies but they are actually a little shell-shaped French sponge cake that melts in the mouth. They can be made in a variety of flavors and look pretty on a serving platter either dusted with confectioners' sugar, one end dipped at an angle in chocolate, or left plain.
Pizzelles: These anise-flavored flat Italian cookies are a perennial favorite but you need a pizzelle iron. If you entertain a lot, the $50 price tag is well worth the investment. One batch of batter makes a huge quantity and can be made well in advance because they keep exceptionally well. While traditionally not dusted with confectioners' sugar, doing so brings out the embossed appearance of the pizzelle iron. While still warm, the wafers can be rolled around a dowel to make pirouette cookies.
Mini cannoli: You can make the pastry tubes for this Italian treat from scratch or purchase them and fill with a variety of fillings, including traditional ricotta, chocolate or something more exotic like mango-honey.
Mini fruit tarts: Fresh fruit in a flaky pastry is always a hit, just keep them small. Key lime is a flavor everyone is craving and it works well in a tartlet.
Phyllo dough pastries: These thin sheets of pastry dough can be turned into mini apple strudels or used as a tart shell for a filling. Of course, don't count out traditional baklava, chocolate baklava, or even bacon baklava cut into small diamonds.
Chocolate truffles: These little bonbons can be flavored, coated and rolled in different finishes, so you'd never guess they all started from the same basic recipe. Best of all they can be made in advance. They will keep well tightly covered in the refrigerator for a few days but for longer storage, freeze them.
Children's Options
If children will be present, have fun things for them to eat like PB&J parfaits in clear plastic cups, purchased or homemade chocolate chip cookies sandwiched with Nutella, ice cream cone cupcakes (no actual ice cream involved), candy-coated pretzel sticks, cake pops, cake in a jar, dessert pizza, and marshmallow rice cereal treats. Don't be surprised if the adults start wandering over to the kid's dessert bar.
Things to Consider When Planning a Dessert Bar
Your dessert bar should reflect a balance of flavors, textures and colors and be visually appealing. You know the old adage about feeding the eye first? Well, it's true!
Keep the desserts bite-sized so your guests can sample many things without feeling stuffed. Mini everything is the way to go.
Whole cakes are less labor-intensive and can be an option, but allowing guests to slice portions at their discretion can encourage waste so the choice is yours. They do make a pretty presentation though.
Place desserts at different heights on different platters. Make sure you have signage for each type of dessert. There's nothing worse than thinking you're in for a raspberry-flavored confection and it turns out to be strawberry.
Consider your guest list. If children will be present, have fun things for them to eat and make sure they don't contain caffeine or alcohol.
What is the theme of the party? Are any special colors to be included in the table linens? Although white table linens are always best, you can add splashes of color with platters (although most desserts look best on white plates, too).
Overturned plastic milk crates or sturdy cubes covered with white or colored linen napkins create staging, and cut-glass or crystal pedestals and compotes will sparkle in the light. Table glitter, ribbons, and streamers also are options.
Don't forget the plates, utensils, napkins, serving utensils and a contingency plan for spills and other accidents. Set up a separate station for coffee, tea, or other beverages you plan to serve.
Don't Get Overwhelmed
More likely than not, setting up a dessert bar is not the only task on your to-do list. Planning and asking for help are the best ways to pull this off. Budget, time, and skill will dictate how many items to feature but six to 10 seems reasonable. Don't think twice about purchasing one or two items from a cake shop specializing in mini desserts. Most of all, don't let yourself get so exhausted you can't enjoy your own event. Party on!